Showing posts with label textile. Show all posts

Tuesday, August 27, 2013

roundup

of some recent projects:

The Phanatic, gilded style--


A client brought in a 150 year old heirloom sampler in an antique frame with verre églomisé (reverse painted glass).  This style of framing fell into oblivion in the inter-war era (1915-1945) and was a lost art until techniques were reinvented around 1990 [source].  Cross-stitch samplers were generally done by school girls.  Love the perfection of the imperfections here--missing letters, letters out of order, and this is the first time I've seen one including the Hebrew alphabet, too!  Such a lovely thing to have!


Here it is all unframed.


We reframed using a linen mat with a hunter green bevel accent for depth and drama, and a rounded wood frame with a vaguely greenish tint.


Next up is a very modern wedding shadowbox.  The wedding included a handfasting ceremony.  The client wanted the ribbons displayed, so I made a loose knot as if the joined hands fit inside (also made it slightly heart-shaped there in the center) and splayed the ends out diagonally.  Ribbons were secured with a combination of clear monofilament and stitchery tape.


 The significance of the colors.  I made a pocket on the back of the frame for this note.


Here it is with me fitting the sidewalls.  Most shadowboxes get lined with sidewalls the same color as the background for a polished look.


Tuesday, August 20, 2013

Cr*ss-St*tch


So I tried my hand at cross-stitch and here is the result.

(This blog is a family show, but the uncensored version can be found HERE.)

I have been seeing more and more cross-stitches in the shop lately and my interest was piqued.  I enjoy knitting and crocheting, but have never really moved beyond those in my off-hours crafting.  And then one day I read a 2005 article that claims that Dame Judi Dench, during her downtime on movie sets, does beautiful embroideries for her castmates chock full of amazing expletives.  Variations of this claim are all over the internet. (All notably without photo documentation.)

source
LOVE that!  It reminds me of art an old friend made in college.  She taught herself to embroider and made a gorgeous feminist wall hanging that said in ornate script, "Love makes women rot from the inside."  HA!  Still love that!  (as I have not forgotten it for 25 years)

And so I found Subversive Cross-Stitch, ordered a kit, and went for it.  

I generally do my crafting at night when the house is quiet.  I do it in front of the news (or the fake news as the case may be).  And I will tell you, this summer was the perfect season to cross-stitch a big F * C K.  It relaxed me as I watched the home team, watched a school system writhe, and contemplated orca captivity.

But another thing cross-stitching this F * C K did for me was inform my framing of them!  Almost immediately as I set to work, I thought about my stretching of it in the end.  Finding centers and counting rows rather than measuring in inches.  I learned some cross-stitchers swear by stitchery tape to mount the finished project.  In completing my own, I found that I prefer to be old school by stretching and pinning.  Also, I chose not to mat this particular piece (it needed to remain small to fit on Mr. Fatale's desk), but I did use spacers and museum glass like some of my textile clients.

There are other schools of thought on how to display cross-stitches, and this summer I had some of them represented here in the shop.  (These less vulgar clients are proper cross-stitchers and do beautiful work.)

This one is unusual in its red background.  This client is otherwise a purist and prefers her cross-stitch work to be framed with no glass, no mats, as is tradition.  Her work is always precise.


And this cross-stitcher treats her work like a precious document--double silk mats, museum glass, and ornate frame.  It is epic in scale (40" long!) and technically brilliant.


These are totally by experts, but there is no beginner-shaming here at the shop.  Now I completely understand what an accomplishment it is to complete even just a tiny cross-stitch.  (My little F * C K is 6 x 6 and took me weeks!)  They deserve to be framed well and displayed proudly (if sometimes privately).  


Friday, May 31, 2013

eastern textures


Some wonderful Eastern treasures came through the shop lately.  The first is an original painting on paper from India.  I happen to have handled a lot of Indian art in my career, mostly paintings on silk, but this one was a bit different in terms of medium, colors, and patterns.

Generally there are lots of jewel-tones and bead motifs in art from this region.  But what I found most striking about this piece was the olive neutral background and the triangle motif border.  (Those brown circle things are soft leather weights to hold the art down--it had been rolled for some time.)


The client and I arrived at this combination of mat and frame.  The mat is a very saturated olive suede.  We held the sample against the art and knew in an instant this was the thing to do.


Below is a detail where you can see the triangles and lines of the art and how the frame relates.


I didn't intend to put these two together in a post, they are from different clients, and the art from different countries, but in going through my photos, I was struck by the similarity of shape (both long horizontals), and the use of the color green as neutral.

Below is an antique embroidery from China.


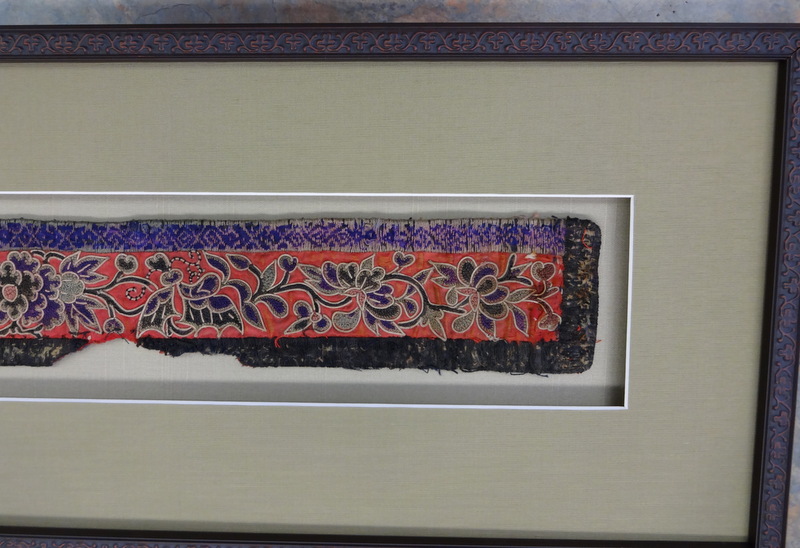
The clients wanted a floating design with a raised mat and I totally agreed.  We floated the art on a pale sage green mat, and raised a slightly brighter green raw silk mat above.  This slender dark scroll motif frame finished the design beautifully.


The detail below shows the grain of the silk, which we chose to run horizontally to emphasize length.  This shot was also a test to see if my technique for raising the mat was visible. From any angle.  Nope!  (There should not be any visible framing tricks--mat should appear to be hovering magically in the air.)


Finished piece below.


I've written it several times before, but one of the great things about this profession is the variety of stuff that comes through the door.  I am so lucky to be able to see and handle items like these.  :)


Saturday, January 12, 2013

fabric of our lives


A dear old friend arrived in the shop wanting to frame this:


A second anniversary gift (cotton) from his charming partner.  A small quilt with a geometric pattern stitched entirely by hand.  Love the swirls of the border contrasting with the straight lines of the main pattern.

There are many ways to frame textiles.  A purist will choose no glass or mats, a designer might choose mats and glass, a conservator might choose a floating design.

Below is an example of a floating design on a small quilt I did years ago.  The quilt is sewn to a fabric-lined mat, then a top mat is cut with a larger opening and raised above the quilt.  The glass rests on the top mat so the quilt is not touching the glass.


But if you've been following this blog lately, you will know that my modern textile clients have been selecting framing designs that have glass and no mats.  The glass is raised above the textile using spacers that fit under the rabbet of the frame, like so:


And also, you will know that I love a wide frame on small art.  Examples below.


So we found a wide frame with swirl details that has a hand-carved look about it.


And it was the perfect thing.

Substantial, but not massive.  It really looks like an extension of the art.  The borders around the art get smaller as they move inward to the geometric design.

Congrats on two years, my dears!  xo


Friday, January 11, 2013

creweladelphia


I LOVE these.  A client came in with some old crewelwork she had done in the 70s and now she wanted to frame them and give them as gifts to her children.

Crewel, a type of embroidery done with wool, is a craft that is still around today, but was quite popular in the 70s.  These were made using special bicentennial kits purchased at Wanamaker's.  

Here they are in their raw form prior to stretching.


We chose a distressed federal style frame for Independence Hall...


 And a weathered barnwood for the Betsy Ross House.


These were done with spacers and glass, like many recent textiles.


Saturday, November 10, 2012

photorealism

I have seen many cross-stitches in my day, but never like this.


This is a photorealistic cross-stitch.  A monochromatic detail of a flower, even.  Let me zoom in a little closer so it can be truly appreciated.


Nope, definitely not grandma's sampler.  And I have to tell you I LOVE what's going on with domestic arts Craftivism.  This beautifully executed textile was given to a client as a wedding gift, and the client chose materials to let the art shine.

I have blogged in the past about the framing of cross-stitches.  They get stretched and pinned around acid-free foamboard, and then either framed like a canvas (frame/no glass) for purists, or framed like an art print (frame/mat/glass) for a more contemporary look.  But recently, I have framed textiles in a third way (frame/spacers/glass).  This way allows the art to still look as though it is treated as a canvas, but protects the fibers from the elements while not squishing them.

Here it is with museum glass, finished with a bright white linen liner and a streamlined muted beveled frame.

Wednesday, July 25, 2012

dan fox


A client came in with this crocheted piece of her own design.  I immediately respected the work as I am something of a novice knitter/crocheter, myself.  The math represented here boggles my mind.


This is a great take on crochet--love the modern block letters and glittery gold yarn!  And while it is definitely not your heirloom doily, the mounting technique is the same.  The art must be hand sewn to the mat in a few (or several) places; it should be as square as possible and with minimal sag. 

I love the framing design here, too.  We went with a super-saturated vinyl mat in a robin's egg blue for a background color, and recessed the art with sidewalls made from the same color into a slender, elegant silver shadow box.  Modern glam crochet.


Oh, and it was framed as a gift for a certain someone whose name inspired this piece :)


woven art

I was at a party when I first heard about these wonderful weavings by Bonnie Bacich.  When they arrived in the shop they were more beautiful than I had imagined.

Zuni Warrior by Bonnie Bacich

Navajo Woman by Bonnie Bacich
They are portraits of Native Americans the artist did on a loom in a reservation in Zuni, NM.  I have A LOT of experience with textiles, but these pieces are transcendent of the medium and absolutely extraordinary.

I have said previously here on the blog, there are two schools of thought on the framing of certain types of textiles. The first way is for purists:  simply stretch and frame, no mat, no glass.  A more contemporary approach is to mat and glaze the work as one would a fine print or watercolor.  But here the client chose a third way, which is to stretch and frame, but put under glass with spacers.  Glazing was added to protect the fibers from dust and the elements, and spacers were used to elevate the glass so the fibers could remain fluffy and not be pressed under the glass.

The client chose substantial frames that really enhance each piece in a classic way.


Tuesday, November 8, 2011

holy molas


A client brought in these colorful molas:  souvenirs from her trip to Panama.  Molas are executed using layers of fabric:  the more layers, the finer the work.  This last one has about seven layers.  I love that there is variety here:  of art sizes, frame colors, and mat widths, but I would say all the frames have a tropical handmade quality about them.  Three received suede mats which just have a great saturation of color--all together this is a really fanciful display.


Thursday, August 4, 2011

cross-stitch

sort of a tutorial

My method for stretching cross-stitch work has evolved over the years.  I was taught one way, read about another, and then settled on a third way I invented for many years.  However, I'm finally ready to proclaim yet another method superior to the others, and it just took a little common sense to arrive at it.

There are two schools of thought when designing for cross-stitch.  The first way is for purists.  Simply stretch the cross-stitch and frame.  No mat, no glass.  It's a style that has worked for centuries.  A more contemporary approach is to stretch, mat, and glaze the work as one would a fine print or watercolor.  Either way the work is presented, the stretching method is the same.

Get tools handy:  flathead pins, thimble, straight edge, granny glasses.  Cut acid-free foam to 1/8" shy of intended overall size for to allow for fabric thickness.


Protip:  Cross stitch people work in very small detail and think about design that way, too.  One time I asked a cross-stitcher how far out from the stitches she's like me to position the mat.  I was thinking maybe an inch or half an inch.  "5 stitches out," she said.  And she brought a stitch gauge out of her purse.  I think of that conversation everytime I stretch a cross-stitch.  In my centering process, I always count rows out rather than solely relying on my straight edge.        


Above, I have located the centers on all four sides, and used low-tack framer's tape to follow specific rows so I don't get all slanty in the stretch.  Below, I locate the center on the acid-free foamboard.  The cross-stitch will be pinned to the sides of it.


Like canvas-stretching, tacking begins from the centers and radiates out...


...following rows in the fabric.


Voila!

The client here chose the purist's approach and went with a perfectly matched slender whitewash ornate frame.


Thursday, July 7, 2011

textile shark

Mounting textiles = shooting pool.
Learning physics is great.  But it means nothing without frequent tactile experience.


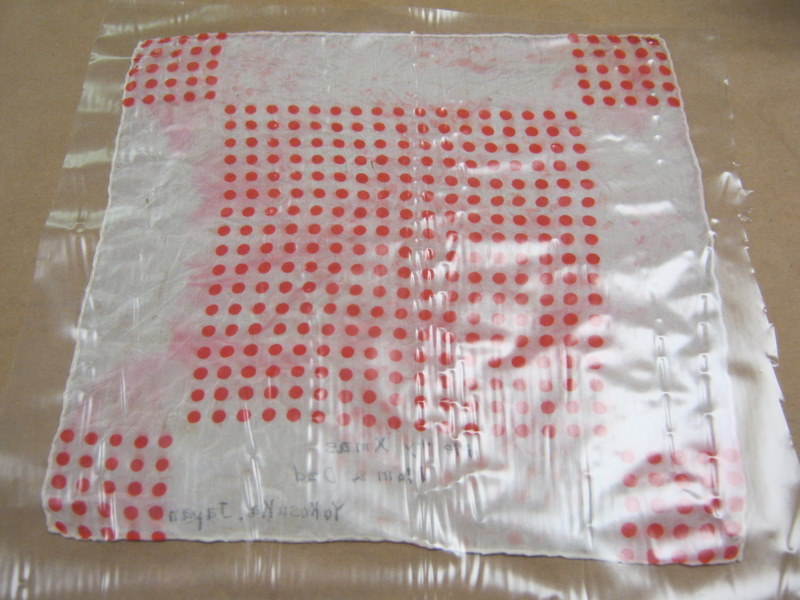
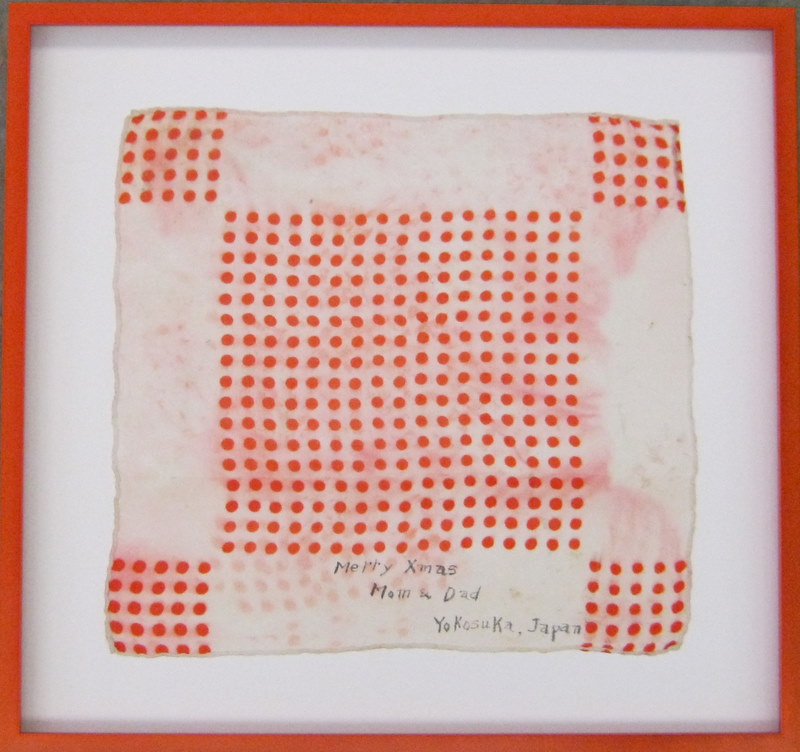
So a client brings in this beautiful fine silk square from 1940s Japan, a family heirloom.  There are some condition issues, the dye has run in spots and upon very close inspection there are some tiny tears, but in all this is a beauty.  I love the bold geometric pattern and the personalization.  I note that silk has no elasticity, and silk this fine cannot be sewn down to the backing (as would be done to more sturdy fabrics) without damage.  Most other methods of mounting would cause sagging.

I turn to fusion film.  This stuff is completely reversible and invented primarily for fabrics. What a glorious day it was when I discovered it could be used to mount Indian silk paintings!  (I am something of an expert in those, too :)  But I wanted to float this item in the center of a mat, not cut an opening in the mat...  

There is a way.  And in the last big shop I managed, we referred to it as New York Style.  I have taught this method to many framers.  It is a great trick to have up one's sleeve.

Step 1.  Put item face down on release, kraft, or other inconsequential paper.  Layer fusion film on top of upside-down art.  Then a layer of release paper and release board on the top.  Put in drymount press on regular settings.


Wait 5 minutes.


Step 2.  Remove item from press.  Carefully score around the outside edge of the art with a sharp blade.  Item will lift off the paper leaving excess fusion film behind.


Step 3.  Position art rightside-up on the matboard selected for the frame package.  Layer release paper & release board on top, like usual.  Put in drymount press.


Wait 5 more minutes.


Now add frame & glass.  Voila!


In this case we chose a vivid orange metal frame with tall spacers.  I love how simple and modern it looks.

You may observe that the scarf is not perfectly square and the edges have some waves.  

Yes.  

Silk is one of those fabrics that if you pull it square one way, then the opposite edge goes out of square.  The very best way to handle it is to let the fabric do what it wants.  Get it as square as possible without pulling and just let it lay naturally.  The fusion mount is an all-over adhesive so this scarf will never sag, ripple, or do anything other than be suspended in this manner.  It can, however, come out of this framing package completely unscathed, and that is the job of a conservation framer.